Virtual Ware Blocks Viruses
Use Virtual Ware To Block Viruses & Protect Your System
![]()
You can protect yourself from getting infected by viruses with the use of virtual machine software. You are protected from viruses as whatever infected that happens to your computer will occur inside that virtual Windows. This entire windows can crash, but it is just a file on your computer. You can visualize this concept as running a windows as a program inside of your Windows. It is quite easy to setup one and it is not going to cost you any money. You can use the same Windows XP installation CD for your virtual OS or download other alternatives like linux for example.
That’s it, this is the hundredth time you had to format your computer because you get hit by a virus or malware and you had enough. Before you decide to pump in huge wads of cash on the latest version of antivirus, thinking that you will be safe from then on. It is only half true. An antivirus program can only protect you if you update the antivirus definitions regularly without fail.
If you get annoyed by the non stop nagging of the updating interface of the antivirus program and decide to switch it to manual update instead. You will realize that you will not do your next update till months later. Also, paying for an antivirus, does not allow you to use it forever, you will need to pay for it every year to renew the registration. Are you willing to do so? Or do you think that a free antivirus will suffice and deal with the threat?
The truth is, no matter how great an antivirus can be , be it free or paid, it is never able to protect against new strains of virus that are being released from time to time. It is until some one gets hit, and the antivirus companies will quickly come up with a detection definition before you can prevent and protect yourself from it.
In order to be totally safe from getting hit by viruses, apart from avoiding shady sites or downloading files from other sources apart from microsoft. You can protect yourself from getting hit by using virtual softwares like virtual PC or Virtual Box. These 2 are free versions which are good enough for a home user. Paid virtual machine softwares are also out there, like vmware for example.
I prefer virtual box as it is free and supports many different operating systems. Unlike virtual PC which is created by microsoft and only allows you to install windows.
Now, before I bore you with just rants about how good this software is, lets proceed with the main focus.
What is this virtual ware all about?
In simple terms, this is a program that allows you to install one more windows or another operating system inside of your main computer and running it just like any program on your desktop. So you can use this fake windows to test or download or simply use this fake windows to do all the online stuff . So if you get hit by a virus, only the fake windows will end up in a fatal error. And your computer will be safe from harm.
How to set up one virtual machine?
Now you are so eager to get started. Enough said, download the program first. Download the correct version for your operating system. Choose windows if you are a windows user. Install it as you would like any program. Installing this program will cut the internet connection and so a re-connection would be required. Start the program as you would like any windows program. Now we will first deal with the settings first, this will give you a better understanding of what is going to happen.

Click on Machine – Settings
In this window you will be able to set the main 2 important factors that determine the overall outcome of the performance of this virtual operating system. As this program plays real, so you will need to set the amount of ram that you wish to give to this virtual computer. If you set too much out of what you have, your own system will run very slowly and by setting the too little for the virtual box, the windows will run like a snail even if you have a super fast computer. The 2nd part is the video memory size, which basically means the 3D card of the virtual computer.
The hard disks category, is to allow you to select a pre-done up virtual file, Every virtual system is actually created and saved as a file, but there is no need to do anything in this part unless you want to load a pre-created virtual machine.
Now we look at the 3rd option which is the CD/DVD-ROM.
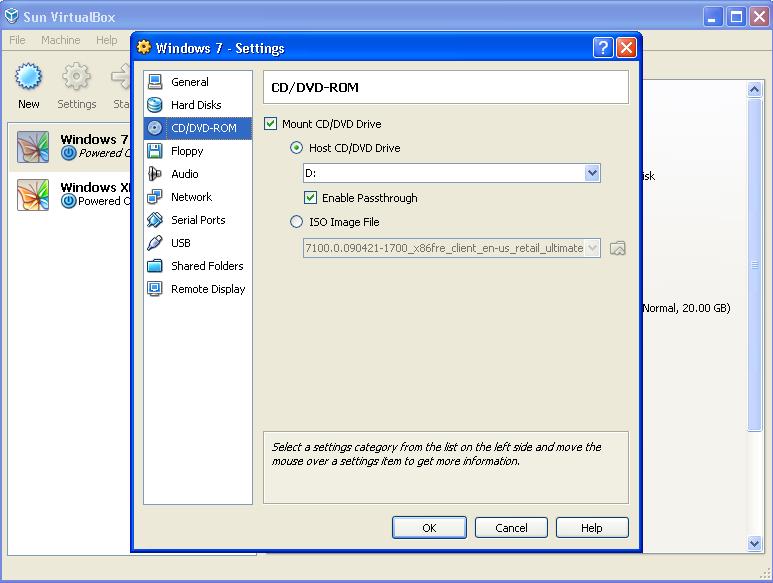
In this menu, you can play around with the options in here. The first option of using the physical drive of your computer to play the part of the CD drive in the virtual machine. The only thing that is new would be the ” Enable Pass through”. This means that your CD drive be controlled by the virtual box directly so that you can emulate the boot off CD to test bootable discs or a windows installation. If not, you will need to press F2 while the virtual machine is starting up to select the boot device.
The second option is to load an iso image. This feature is useful when you need to test downloaded boot discs which are in iso format. Thus there is no need to burn it to a CD. Simply select that file from here to see the actual disc being loaded.
The rest of the settings are straight forward, which by default does not require any changing.
Now for the shared folders option.
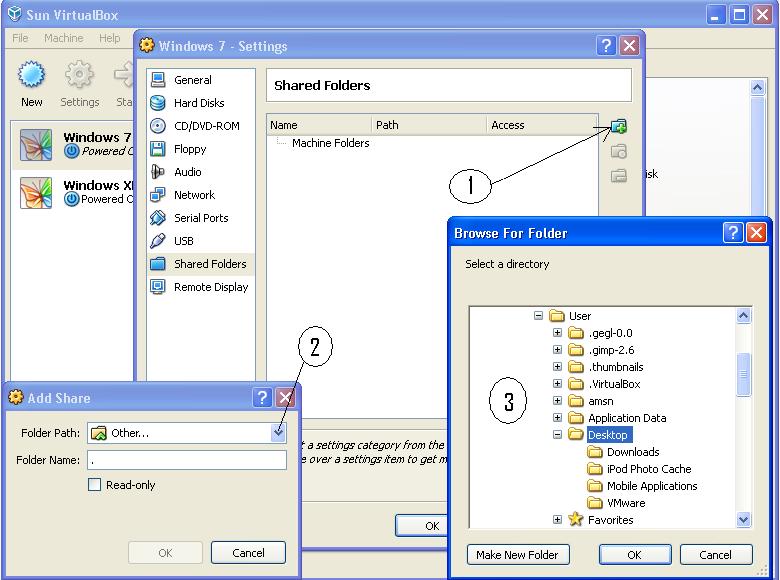
This option allows you to set a folder in your system to be used as a shared drive to allow you to transfer files between your real operating system and the virtual machine. Click according to the numbers and in this example, we will use the desktop as a shared portal.
Activating the folder to be used on the real windows is quite tricky, which will be explained in the next screen shot below. The screen shot below already has a functioning windows installed. The actual process of installing it will be showed further down the post.
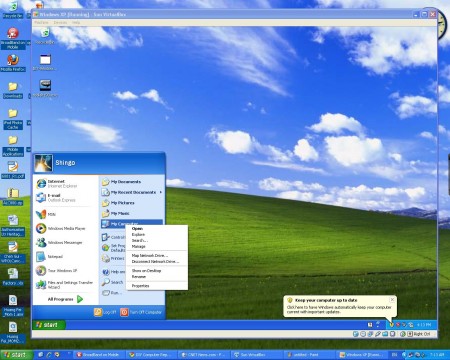
What you see in this screen shot is a windows running inside of a windows. It is not a screen shot or edited image. Now you will need to control the virtual windows to activate the shared folders. Click on the start menu and right click on my computer, select ” Map network drive “.
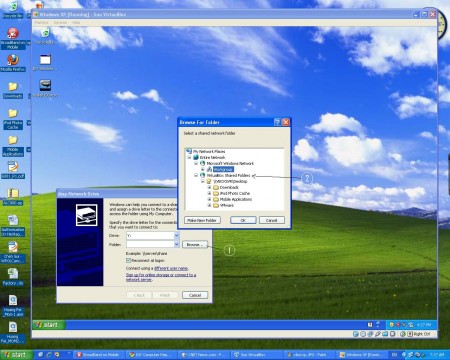
In this screen shot, you will see that you need to choose the drive which is set as y: Actually, the drive does not matter, as long as it does not conflict with existing basic drives like C or D or E. The reason why it is set at such a odd alphabet is so that it is easy to identify this drive as the virtual shared folder drive. Click as showed in the picture to the numbers. You will see the virtual box shared folders showing up as a network. That is the physical drive that you use to transfer files between the virtual windows and your real desktop.
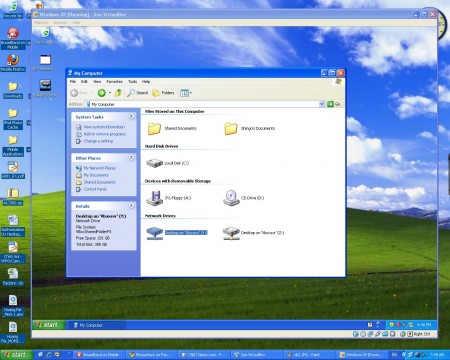
Once you have selected the folder of your choice, they will show as network drives under ” my computer”.
Installing the virtual Operating system
Finally to the main focus of this topic, which is to create your virtual windows. As shown below, would be the steps that is to create a new virtual box.
1) Click on next, nothing special
2) Name your virtual box and choose the correct OS version.
3) This place is to allocate the amount of rams for the virtual Operating System, if the amount of rams is set too little, the windows will run at the snails pace, just like in a real situation. If too much is given to the virtual box, your real system will suffer.
4) This area is to allow you to create your new hard disk or to use an existing previous created virtual operating system.
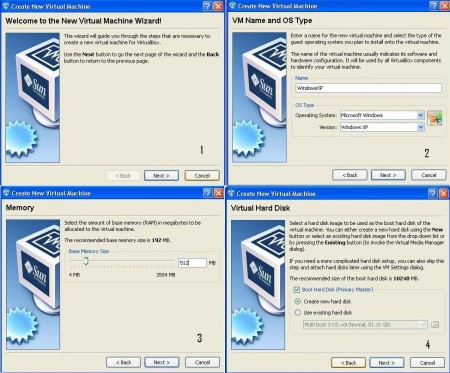
5) If you choose to create a new one, there will be 2 choices,
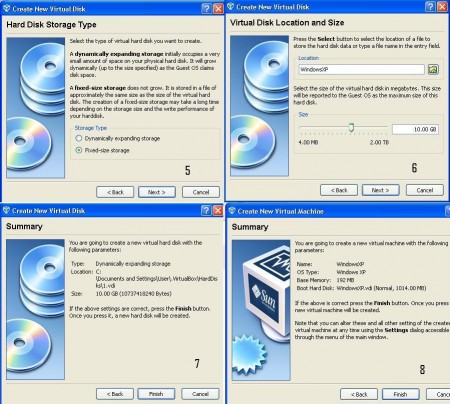
Dynamic expanding – This means that the size will increase with the amount of stuff installed. Most suitable for computers with lack of extra hard disk. However, it is not as fast as a fixed size configuration.
Fixed Sized Storage – This configuration will set a fixed amount of space to be used for your virtual Operating System. You can set as much as you want, but it is best to be realistic as you would not want to waste your precious disk space on a virtual Operating System. The larger you set it, the longer it takes to create the drive.
6) This is the place you assign how large you want the drive to be.
7) Finalize and confirm your settings.
8) Your virtual drive has been successfully created.
Proceed with the actual installation
You will see your created virtual drive at the left hand column. To run it, you just need to click on it and press the start arrow at the top menu. You will see an actual startup prompt just like a real computer and it will end with the message ” fatal: no bootable medium found! system halted.”
You will need to insert your windows XP or Operating system disc into your drive or mount the image of that bootable disc to a virtual drive program like D-tools or simply just select the file using the menu under devices => mount CD/DVD-ROM.=> CD/DVD-ROM image.
You will need to set this before you start the machine running. So long, your operating disc is really functioning and bootable, the installation will kick off, and what you see on screen will be exactly what is happening in a real computer. The rest of the stuff will be as per installation through the Operating System and nothing to do with virtual box program.
If you do not know how to install windows , please refer to this article here
You will need to take note of a few things when using virtual box is that ,
1) If you click on the window, the mouse will be stuck inside that virtual windows and you will need to press the CTRL key once to release the mouse back to your current windows.
2) If you do not shut down the windows from inside of that windows, it plays real, and the next time you start that virtual OS, it will show you the white menu telling you that windows did not shut down correctly and choose a mode to continue.
Installing virtual box additions
Once you have the windows running inside of virtual box, you will need to install something called virtual box additions. This term sounds real odd to many, however, it basically means one thing, which is to install all the drivers for that virtual windows. Because, it is not a real windows, there is no way you can install the drivers for the video or sound as there is none. Thus, you only need to install that ” imaginary ” driver pack which will work for all, irregardless what hardware you have.
Here’s how to do it, click on devices => install guest additions. This must be done only when you enter windows. When you do that, it simply emulates the point when you insert the drivers CD into the disc drive. The installation setup will start just like any program and you just have to click next all the way to complete the installation.
So what happens after you install this virtual box additions? You will get sound, internet and you can even expand the virtual windows to a total full screen by pressing the CTRL + F.
Also, your mouse no longer gets trapped inside the virtual windows from now on and you can simply click between this 2 windows with no hassle.
I hope this article is clear enough for everyone to understand. If there is any part of this tutorial that needs more clarification, you may forward your queries to the webmaster.
5 Comments Already
Leave a Reply
You must be logged in to post a comment.
Thanks for the info. I use Nod32 and it works pretty well. I’ve had a hacker on my blog recently. I don’t think he has been on my PC, though. I have the Windows fireway turned on. I was wondering, though if I encrypt the data on my PC will this make it more prone, less prone, or the same amount of prone-ness to viruses?
It may seem logical that it is protected by encryption and virus is unable to write to it. But so long you need to use the drive, it becomes unlocked and it would still be opened to virus attacks. So it is not really a feasible route of protection.