Install WinXP Virtualbox Mac
 Welcome to DIY Tech Tips & Guides article on how to install Windows XP in Mac OS X using Virtualbox. While this may seem pretty easy for a lot of people, it can be quite a daunting task for users who have not done this before. Therefore I decided to come up with a very detailed and comprehensive guide on how to install Windows XP in Mac OS X using Virtualbox.
First of all you will need to download the Virtualbox software package and install it. Run the Virtualbox software from the applications folder.
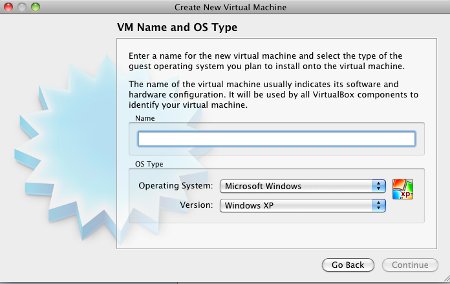
Start program and click “New” and enter a name for your virtual operating system
Click “Continue”
Drag the Slider to the amount of Ram you wish to allocate for the virtual OS.
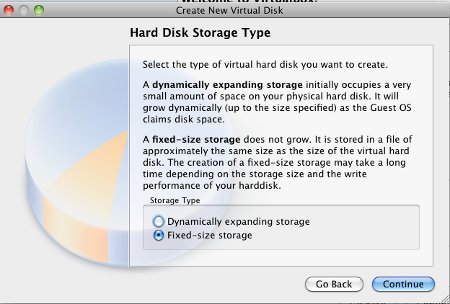
Create a new virtual hard disk
Create a fixed size hard disk will be a better choice in terms of speed and stability.
Default settings will do just fine for the size and location of the virtual operating system.
Click on “Done” when ready.
Wait for a while for the virtual drive to be created.
Click “Done” after the hard disk is created.
Now you will need to adjust and set a few settings. You can adjust those options like Rams, how many CPUs to be used etc.
But more importantly, you will need to mount the Windows XP installation CD.
Click on “Settings”
Click on “Storage”
Click on the CD icon which should be called “Empty”, click on the “CD icon” no the right side under attributes.
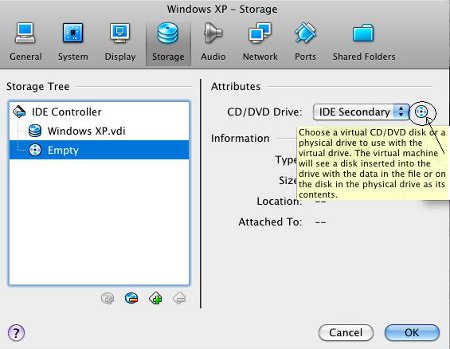
Choose a “Virtual Disc file” which is a disc image like .iso etc , or “Host Drive”, which means you have your installation disc in the drive of your computer.
For me, I prefer to use image files, since they will be so much faster then using the real CD itself.
Close that window and now you can click on the “Green arrow pointing to the right”
If you get an error message telling you that “VERR_VMX_MSR_LOCKED_OR_DISABLED”

Click on “Settings” => “System” => “Acceleration”.
Uncheck the “Enable VT-X/AMD-V
Now you should be able to start your Virtualbox operating system by clicking on the green yellow arrow. Make sure you have mounted the Windows XP installation CD as stated in the steps above.
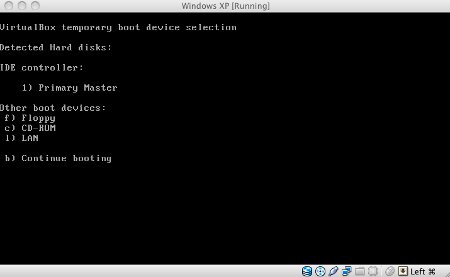
Hit F12 the moment you see the Virtualbox splash screen. You will also be able to spot that message telling you to “Hit F12 to start the boot device”
Now you should see a menu asking you to choose between Primary Master, Floppy, CD-ROM, LAN or Continue booting with the alphabets at the left to those options. You will need to hit the letter that corresponds to the boot device you wish to boot to. So in this case, we hit “c”.
The installation of Windows XP should kick off right away. Follow this video to finish off with the installation of Windows XP. Once done, you will need to install something called the “Virtualbox Guest additions”. This is the equivalent to hardware drivers in the computer. After installing this Guest additions, you will be able to share files between the host operating system Mac and the Guest operating system Windows XP.
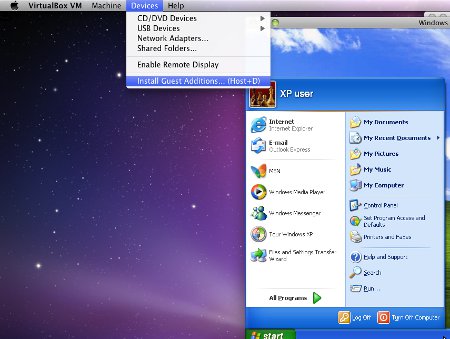
Click on the Virtualbox Windows XP window and click on the “Devices” = > “Install Guest Additions”. Clicking on that will be equivalent to inserting the drivers CD into the CD drive inside the XP computer.
Now you will open the Windows Explorer in the Virtualbox’s Windows XP and double click on the VirtualBox Guest Additions D:
Breeze through the whole installation by clicking next on everything. You can ignore the “Direct3D Support” for now. If you really want that support, you will need to reboot XP and enter in Safe Mode. Do another installation of the Guest Additions again and this time round, put a check on that box before the Direct 3D support will work.
One obvious difference after installing the additions is that you can now fly in and out of the Windows XP without having your mouse getting stucked in the Windows window and having to press the host key to jump out of the Virtualbox.
Running Windows XP in windowed mode implies that you have limited working space. Even if you make use of the “Host F” key to maximize the screen, the entire XP will cover the Mac OS X making it difficult to work between both the operating systems. You can make use of the “Spaces” feature. Simply start the Virtualbox in a new desktop so that you can switch between the operating systems and have them both running in full screen mode.
I hope this article on how to install Windows XP in Mac OS X using Virtualbox is easy for all to follow.
2 Comments Already
Leave a Reply
You must be logged in to post a comment.


VirtualBox is very helpfull software. I can test new software in virtual system and my oryginal system is safety.
I always enjoy reading these article. I use virtual box to run multiple OS on Windows 7 (multiple screen of course).