Install Mac OS X Lion Onto Compaq laptop

Hi there fellows, it’s been a hell of a long time since another awesome guide showed up here. This guide will show you how to install the Mac OS X Lion onto the Compaq laptop. Many hackintosh guides out there are usually very general, meaning to say it does not go in depth to the exact files and procedures on how to install it onto a specific make and model. This article will focus on how to get the newest Mac OS Lion installed. In fact, you can do a dual / multiple boot of Windows, Mac OS Snow Leopard and Lion together in one Compaq laptop.
First of all, please refer to the how to install Snow Leopard on a Compaq laptop guide first. The steps and procedures are pretty much the same. But there are some slight changes that you need to take note of. Once you have completed the initial steps of installing Snow Leopard on your Compaq laptop. Lets proceed with the preparation stages first.
Prepare your Compaq laptop for installing of Mac OS Lion.
I assume you have followed the installation of Snow Leopard and is pretty familiar with the procedures. I will cut it short here, because the harder part is below. The steps are as follows.
Update your Mac OS Snow Leopard installation to the latest ComboUpgrade first. DO NOT REBOOT YET…
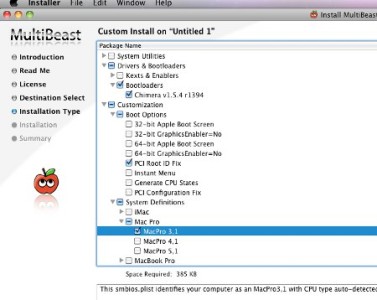
1. Install Multi-beast ( Choose the stuff you want, audio, graphics, etc )
Install these from the Multi-beast ( Important. Must install )
2. Customization => Boot Options => PCI Root ID Fix
3. Customization => System Definations => MacPro => 3.1
4. Drivers & Bootloaders => Chimera
If Multi-Beast closes, re-open again and again while leaving the ComboUpgrade prompt telling you to reboot held behind. Only after installing this System Definitions will you be able to proceed with the installation of Mac OS Lion later on. Note. the ComboUpgrade must be installed and you must not reboot your laptop before you write in the ID. You will never be able to write in the ID after rebooting, no matter how many times you try.
Start the system profiler program and check the information there to ensure that your system is now showing Mac Pro 3.1. If it is not, re-install the Mac OS Snow Leopard again.
Install Mac OS Lion.
You will need to download and pay for Mac OS X Lion from the App store. There is no point downloading the Mac OS X Lion from torrent sources since you will need to login to your Apple account and in turn it will still check online against your account to see if you indeed, purchase Mac OS X Lion.
Since it is a 4 Gig file, you can leave it over night to download while you go to bed. You cannot resume it if you interrupted your downloads half way, but you are allowed to re-download as many times as you like as long as you have paid for it.
Download the Lion Disk Maker software from blog.gete.net. This is a software that allows you to create a DVD out of the downloaded app from the App Store. Even though there is no need to do so, I recommend burning it, since it helps because in the event you wish to re-install Mac OS X Lion again, or on another system, there is no need to re-download over and over again.
As long as you see the Mac OS Lion app listed in the “Applications” menu, you can run the Lion Disk Maker program and it will proceed to burn the downloaded Mac OS Lion to a DVD. The whole process is quite long, 15 to 20 minutes of cold waiting. No interface, nothing. Just the drive blinking and some sounds that symbolizes that the laptop is working hard. Eventually, a prompt will appear congratulating you of a success in creating the Mac OS X Lion DVD.
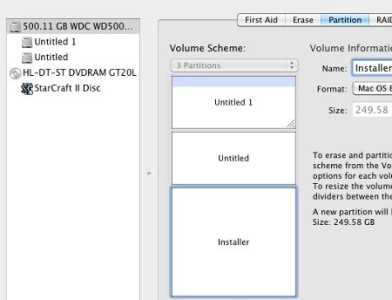
Prepare an Installer Partition
Start the Disk Utility, we need to create a new partition, click the “+” sign and create a partition. Create one new partition which is also of a Mac OS Extended (Journaled) format. Actually 8 Gigs will suffice. This partition is for the whole Mac OS X Lion to reside in.
Prepare the Mac OS Lion partition as well using the same steps. But this time round make the partition even bigger. Depending on how big you want your Mac OS Lion drive to be. Use Mac OS Extended (Journaled) as well.
Once the setup is complete, you can proceed to click on the Mac OS X Lion icon to start the installation. Note. It does not install at all. The whole process all the way until it restarts is simply extracting the files and putting it somewhere in your drive.
Using xMove
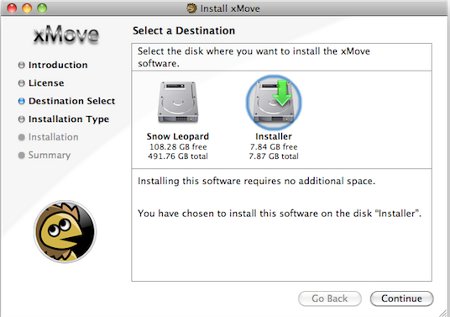
We will need to make use of a program called xMove to transfer the Mac OS Lion’s extracted files to the new partition we have created.
Download xMove and run the program, Choose the “retail app store install”. Exercise extra caution when it asks you to you to choose installation location. Click on the “Change Destination” button to check that it is pointing to the installer partition and not somewhere else. It will point to your Snow Leopard partition by default, which is incorrect. Manually change to the new installer partition. After making changes to the install destination, it will ask you if you are installing via App store or USB. This is not a bug. It simply restarts the whole setup again, but the general rule is that you must look carefully to make sure that the installation program is pointing to the correct area. Once you are sure, click on continue and it will take quite a while to be completed with the moving of the files.
(Optional) Re-Mounting Lion Disk
In any event, something went wrong, and you need to re-install the whole Snow Leopard from scratch. I will show you how to make use of the Lion DVD that is already created. You cannot just insert the disc into the drive and expect it to work by double clicking on it. You will notice that xMove will end with errors.
You will need to mount the whole Mac OS X Lion DVD as a DMG image. Start Disk Utility and select new image after you have inserted the Lion DVD inserted. The Lion DVD will be ripped out as a DMG file. You will need to start Disk Uiltilty, click on “File” => “Open Disk Image”, and select the ripped DMG image file.
You should be able to proceed and finish xMove with no errors.
Installing Lion.
Reboot your laptop and prepare youself to hit any key when the system is at the booting up stages. If you want, you can keep on tapping on the arrow key of the laptop so that it will freeeze the boot up when it is at the Apple Logo. Note, you must be using the Chimera Boot and not the Chameleon boot. If you haven’t done so already, quickly use MultiBeast and install Chimera instead as your Bootloader or else you will encounter issues when installing Lion. Now it should pause at a screen that will allow you to choose between your partitions. Choose the “Installer” partition. If you have a lot of partitions, you will need to hit the arrow key all the way because your “Installer” partition is out of the screen.
You can try installing without the “-v -x” without the quotes to see if it works. The installing is generally quite similar to Snow Leopard. You will come to a point where you are asked if you want to install over an existing Snow Leopard or a new partition. I suggest install onto a new partition as the better choice. For me, the Compaq Laptop will encounter an error where by you are unable to sign in even though your ID and password is correct.
Once you have successfully installed Mac OS Lion and you know it loads up fine, you may get issues such as non-functioning keyboard, sound, etc. Simply restart by powering off the whole laptop and just like how you will do it earlier, pause the start up with the arrow key of your keyboard and this time round, use the “-v -x” without the quotes to start the Mac OS X Lion in Safe Mode.
If you start in safe mode, you should be able to use the keyboard. In any event you can’t use the keyboard or mouse at all. Go get one USB to PS/2 converter and hook up a physical keyboard and you should be able to at least take control of your laptop so that you can install the kexts.
Installing the Kexts
Here are the kexts you need to install to get everything working. Take note that you will need to install the Multi Beast for Lion now, so please take note and do not use the wrong version. Using Multi Beast for Lion, install these stuff
Drivers & Boot Loaders => Audio => Universal => Voodoo hda ( last entry )
Miscellaneous => Voodoo PS/2 Keyboard Controller
OSx86 Software => Kext Helper b7
The Wi-Fi kexts for the Compaq CQ 40 is atttached in this article, you need to Download the Wi-Fi kext. Extract the contents and use a drag and drop manner to insert both kexts into the kext helper b7 window, key in your password and install. If you do not know where kext Helper is, use the Finder to search for it. Reboot and the Wi-Fi should be working.
You will find that the mouse scroll is moving in the opposite directions. This is because Apple made the new OS more suitable for the touch sliding mouse. In order to return it to normal, simply go to the “Settings” and uncheck the “Move content in the direction of finger movement when scrolling or navigating.
As long as you did install the Chimera boot and had the Snow Leopard, Lion and Windows installed in different partitions, you will be able to pause at the boot up screen and make your selection to boot into the various different operating systems. I hope this guide is useful and easy to follow.


Leave a Reply
You must be logged in to post a comment.