Install Jolicloud And Run Off A Thumb Drive
Install Jolicloud and run off a thumb drive is one of the best things to happen in the occur in the computing world. Install Jolicloud into a thumb drive allows you to carry the whole operating system with you. Imagine that you are on the move and you need to log on to send an email, you may need to brrow someone’s computer. The fear of having your login credentials stolen because no body can be sure that your friends computer is totally rid of malware. Having a trusty Jolicloud operating system in your pocket solves everything.
Image source : http://www.jolicloud.com
Jolicloud is a special version of Chrome OS that works right out of the box. It is compatible with almost every single hardware. This amazing Jolicloud even works even if you boot it as a Live CD. I am not joking. Every single component of your computer ranging from sound to Wi-Fi will be functioning the moment Jolicloud starts up, Installing it direct or simply running off as a Live CD. Since running off as a Live CD will not allow you to save any settings, in this guide I will show you how to install Jolicloud and run it off a thumb drive.
My guide is different from the one from the Jolicloud official website. If you follow the procedure by Jolicloud, The whole startup of Jolicloud via a thumb drive is horribly slow. I have modified my installation so that booting up from the thumb drive is a whole lot faster. Using directly via thumb drive will be possible with negligible lag. It is highly recommended that you use a USB 2.0 thumb drive. The capacity has to be larger then 4 Gigs. The USB 2.0 specifications is to improve the performance of Jolicloud. In fact, I recommend at least 8 Gigs, because a certain amount of space will be required to be partitioned as a special format to function as imaginery “hard disk space”
Download the Jolicloud iso file and burn it to a blank CD. Connect the thumb drive to your computer, with the Jolicloud CD inserted in your CD drive. Reboot your computer to boot off from the Jolicloud CD. You will see a menu that will let you try the OS or install Jolicloud . Select install Jolicloud. The first few pages of the installation is simple and straight forward . The partitioning page is the part where it is important. Be very careful in this place or you may screw up of your existing Windows OS.
Choose the option that states that you can erase and use the whole drive. But after selecting that option, you will need to click on the dropdown menu and choose your thumb drive.
Even though it is highly recommended that you physically unplugged every single hard disk from your computer, there is a possibility that Jolicloud may make modifications to any other hard disk. Therefore you must check the “advance settings” to see if Jolicloud has indeed attempted to make any settings to the other drives. It is obvious because the settings should only write to one drive such as Sda. If it shows not just a single device but a mix of Sdb or Sdc, I suggest you abort the installation and check if you have other drives connected. Jolicloud may decide that another drive may be more suitable to be installed onto then the thumb drive. Remove the other drives before you install Jolicloud again.
Choose use the entire drive and then select your thumb drive from the drop down menu. After that, select partition the drive manually. Follow the steps to partition correctly. I must emphasize , please make sure that you know you are partitioning the correct drive.
If there are existing partitions on the thumb drive, click on all the partitions and select delete to make sure that the whole thumb drive reads as free space.
1. Click on the free space, Create a Logical Swap partiton with a size of 512 Meg at the end of the drive.
2. Click the rest of the free space and click add. add one Logical Ext 4 partition of 4 Gig in size create it at the end of the drive.
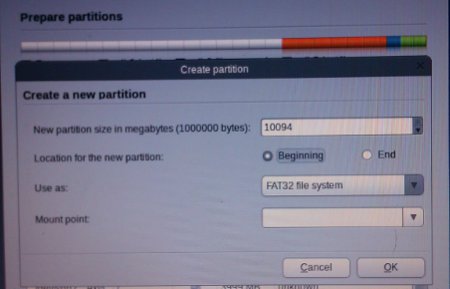
3. Click on the remainding free space, add a Primary Fat32 partition .Create this partition at the beginning of the drive.
Click on forward. Now check and make sure that the bootloader is pointing correctly to be written to the thumb drive. You will receive a few warnings where by it will state something such as the partitions do not have any mount points and therefore will not be used. Ignore the warnings and just proceed.
You will only need 3 partitions, even though the screenshot showed 4, I only created 4 in that experiment to test something.
The installation will take a while since it is installing onto a thumb drive. Once the installation is complete, you can use this thumb drive on any computer as long as it supports booting from USB. My guide will result in a faster performing Jolicloud as comapred to using the USB creator from Jolicloud themselves.
The thumb drive can be double up as a usable thumb drive and will be readable in Windows system. If you wish to revert the thumb drive back as a storage medium again, You can download the HP Format Tool. Use it to format the thumb drive, Quick format works well enough.
Now you can use the thumb drive in Windows, and use Jolicloud as bootable Live disk. Is that cool or what


Leave a Reply
You must be logged in to post a comment.