How to use Freenas 8 In Windows Virtualbox
 This guide will show you how to use Freenas 8 In Windows Virtualbox , especially for the non tech users there is practically close to zero guides out there that actually teach people how to use Freenas 8. Even if there are any of those Freenas guides out there, they will only show you how to install Freenas. Which is pointless since installing Freenas is as simple as inserting the bootable CD and let it go from there. What the users want to know is how to use Freenas 8 and not just about how to install the software. In this guide, I will show you how to install, setup and connect to Freenas.
Step 1
Install Virtualbox
Download and Install Virtualbox first. Run the Virtualbox software and choose the “New” icon to create a new virtual machine. Name it anything like Freenas for example. You can generally breeze through the settings, there is nothing much to change, you can use the 192 meg rams. adjust the size of the the hard disk as 4 Gig since Freenas only requires 4 Gigs worth of installation space. Once the new virtual machine has been created, we need to create an additional hard disk for use in Freenas 8.
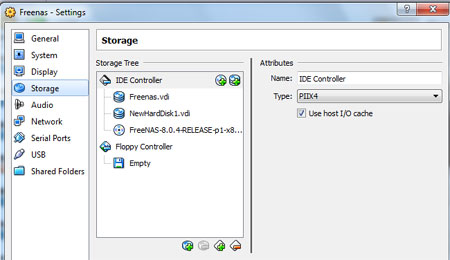
Click and highlight the Freenas virtual machine and click on the “Settings” icon. Go to the “Storage” category and highlight the “IDE controller” , click on the small icon on the bottom to add a new hard disk. Select “create a new hard disk”. You can use VDI file type. Create a size as large as you want. Since it is a separate VDI file on its own, you can copy that VDI file to a USB hard disk, after that, simply point the destination of that hard disk to your USB drive. This makes it easy for you to backup the whole Freenas database.
Step 2
Setup the Virtualbox for Freenas
Highlight the Freenas OS that you have just created and click on the “Settings” icon at the top. Click on the “General” category, check that the Operating System is set as “FreeBSD.
Click on the “Storage” category and we will need to attach the Freenas iso disc and also the large VDI file that you have created and copy to the USB hard disk. Click on the “IDE Controller” option followed by the icon at the bottom to add a new hard disk. You will be asked if you want to use a new hard disk or an existing one. Of course you can create one now, but since we have already created it before hand, simply choose use existing one and make sure you point it correctly to the VDI that you want to use. USB hard disk or not , it is your choice.
For the CD drive icon, you will click on it and browse to the Freenas.iso file that you have downloaded.
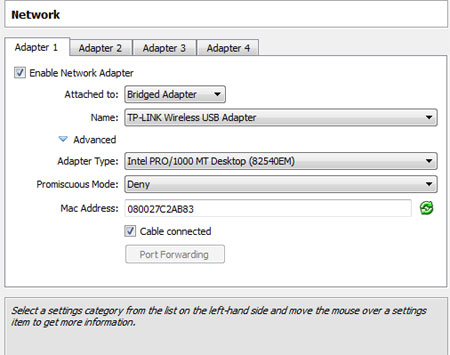
Click on the “Network” category, this is the area where you will need to keep changing and play by ear. If you are not able to connect to your Freenas after running your Virtualbox, keep switching till you are able to get a valid IP address so that you can connect to your Freenas. Most users may get it to work by leaving it set as Nat. But for me, my connection is as follows.
Step 3
Install Freenas
Once all the above settings are completed, you can start your virtual operating system. It will boot up and if you did mount the Freenas.iso correctly you will be able to load the installation by hitting F12 while the Virtualbox is begining to start the OS and press c to kick off the loading of the CD. You will come to a text menu that will eventually load option 1 even if you do not hit any key.
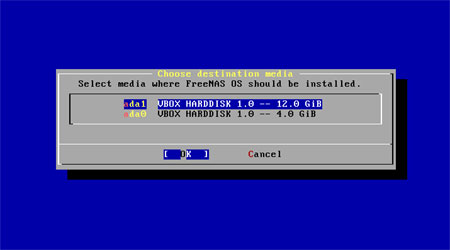
You will choose “Install/Upgrade” to hard drive. If you did the steps correctly and have both your virtual hard disks mounted correctly, both hard drives will show up as the options for you to install to. If it does not show up now, it means you will need to check if you have setup the “Storage” category correctly. You will install to the 4Gig drive. The larger drive will be reserved for use at a later stage.
The installation will be simple and all you see is 2 warnings. One will be telling you to make use of a thumb drive instead of a physical drive. The other is that all the information will be wiped out. It is okay, since we are installing via Virtualbox. Once the installation is completed, you will be brought back to the main screen. Choose reboot.
While the virtual machine is rebooting, we will remove the Freenas.iso. Or else the system may keep loading into an endless cycle of Freenas installation. Click on the “Devices” option at the top, “CD/DVD Devices” => Remove disk from virtual drive.
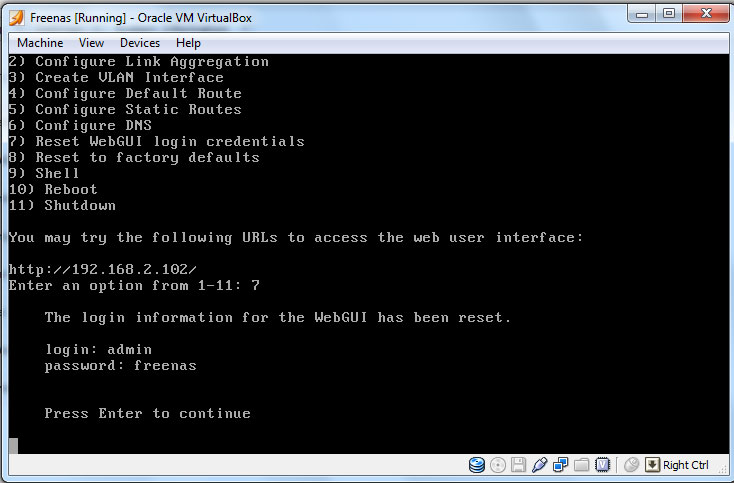
This will unmount the Freenas CD so that you can boot into the local drive. The Freenas will do a auto reboot again if this is the first installation. If everything goes smoothly, you will end up with a screen with some text. You will notice that your IP is shown below.
Step 4
Use Freenas
Simply key in the IP address into any browser and you will be able to get to the Freenas web interface. You will be prompted to change your password if this is your first time accessing Freenas. There will be a flashing red dot indicating that there are major issues that need to be addressed. The default user ID will be “admin”, and the password will be freenas. If you are unable to log in. Using the Virtualbox Freenas text interface, type 7 and hit enter to reset the password.
Step 5
Add or create a volume
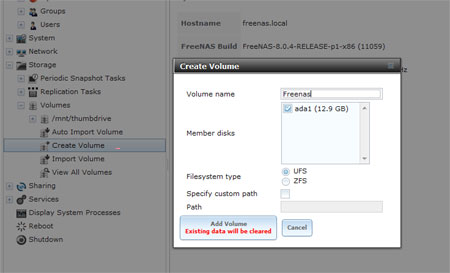
You will see a list of menus at the left side. Scroll down and you will see a category called “Volumes”. We are going to attach the large hard disk that we have created previously. A fresh hard disk that has not been used before by Freenas will not be viewed as a drive. So in this case, we must create a new volume. Click on Create Volume, type in any name or description for the label and put a tick on the drive that you see there. Obviously there should only be one option.
You only need to create the Volume once. The next time you format your computer or need to attach your USB hard disk, you will connect your USB drive and mount the VDI file like how I have showed you in step 2. Use Add Volume and you will be able to access all the files you have previously saved in your Freenas.
In the same Volume options, you can also use the export option which means ejecting the disk that you are using now, you are also given the option to destroy all data in the disk. But be careful with that feature, do not click on it accidentally or all your information will be lost.
Step 6
Enable Sharing
Click on the Sharing option and you will see CIFS, AFP and NFS. Depending on the types of computers you use in your home network, you will need to add the Share accordingly. Generally in laymans terms it is the same as renaming the hard disk into a folder and get it to be set as “Shared”. If you have Mac and Windows computer in your house using this Freenas server, you must create for both.
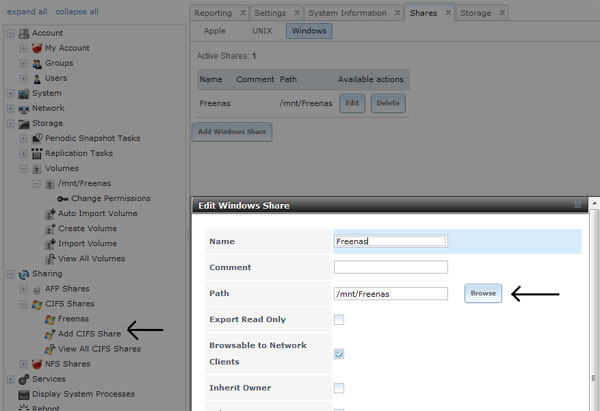
There is also a allow guest access option. Put a tick on it and you do not have to key in any password etc when you try to connect to it later.
Step 7
Enable Services
Before the Freenas can be detected by other computers, you will need to activate the Sharing Service, in layman’s term, enable Sharing means how you want the Freenas to communicate with the computers. Different computers communicate via different protocols. The Freenas system come with various types of communication standards. Put ticks on the system that you need to share to, the icon there represents the type of operating system you use in your house. For the standard Windows users, simply enable the CIFS option. Mac computers, enable the AFP option.
Connect to your Freenas in Windows.
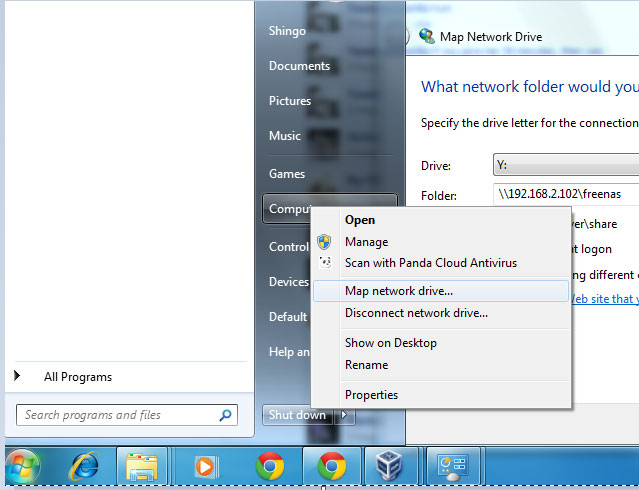
As long as your Freenas is running properly and the settings are done up correctly, you can connect to Windows in this way. Click on your Start Menu , right click on the “Computer” => “Map Network Drive”. Key in the path parameters in the following manner.
\\192.168.\x\x\Freenasshare
You are required to replace the numbers with your own IP address and also the “Freenasshare” with the name you type in step 6
Now you will be connected to your Freenas hard disk via your Windows Explorer and be able to transfer files in between the Freenas network.
Leave a Reply
You must be logged in to post a comment.