Install XP After Windows 7
How To Install XP Inside A Computer with Windows 7
 Windows XP can come in handy since it is more compatible with older software, DIY Computer Repairs shows you how to Install Windows XP after Windows 7.
This situation is more applicable in the current trends as more and more computers now come pre-installed with Windows 7. If you do not have the full installation disc of Windows 7, you cannot simply erase the whole drive so that you can install Windows XP first. I know it is easy to install multiple Windows operating system in a chronological order, but it is not that simple if you want to install Windows XP over a newer Windows.
First, I assume you have Windows 7 running in your computer. Now you want to install Windows XP in the same hard disk. You will need to partition your drive into two parts so that Windows XP has a place to install to without messing with Windows 7.
You can download any free partitioning software to partition your drive.
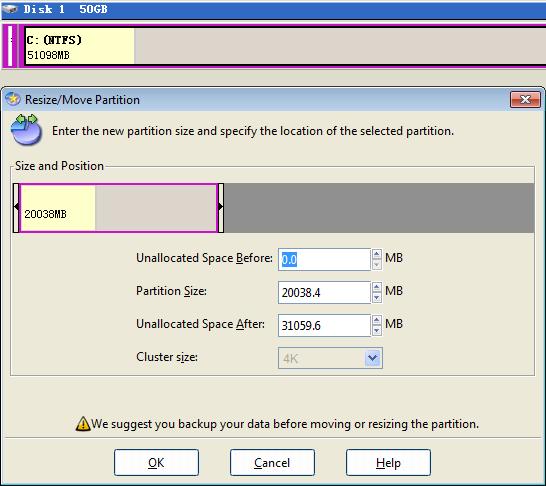
Resize your drive to your own preference and size. Right click on the partition and select “Resize”. Click and hold to drag the end of the bar leftwards. The values below this bar chart will adjust by itself to tell you how much drive space there is before and after. In my example, I have given around 20 Gig to Windows 7 and reserve 30 Gig for Windows XP. Click on the “Apply” icon at the top left hand side of the menu and allow it to make changes to your drive.
Your system will reboot and the actual resizing will occur outside of Windows. Don’t hit any key when it is starting or you will cancel the whole re-partitioning. There is actually no need to format it since you can do it inside the Windows XP installation later on. It is also easier to identify between the 2 drives later inside the installation if the drive is not formatted.
The drive will not show in Windows since it is not formatted. But you can check if the partition is sucessful with this command. Press the Windows Key + R and type this command.
compmgmt.msc
Press enter and you should see the Computer Management console. Select Disc Management from the left side and check if you have the unallocated space as shown in the screenshot below.
When you are sure that the new partition is created, you can proceed to install Windows XP as shown in this tutorial, except that you must not choose the wrong partition. At the end of it all, you will discover that you will boot into Windows XP and Windows 7 is totally missing.
Don’t panic, I will show you how to get Windows 7 back. First install all your drivers for your system and get online. You will need to download EasyBCD program. Alternatively you can also download this program before hand and transfer it across using a thumb drive. Install it and follow the instructions below to get the Windows 7 partition back. You will also need to install Microsoft .NET Framework first or else the program will not run.
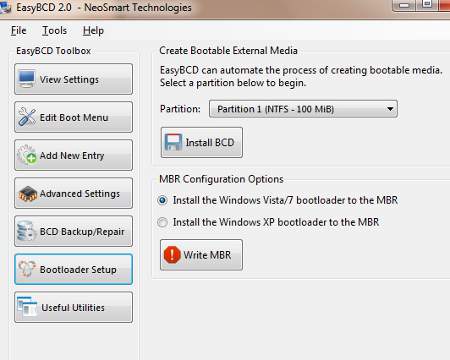
Click on “Bootloader Setup” option at the left side and select “Install the Windows Vista/7 bootloader to the MBR”. Click the “Write MBR“. This will change the Master Boot Record [MBR] to load Windows 7.
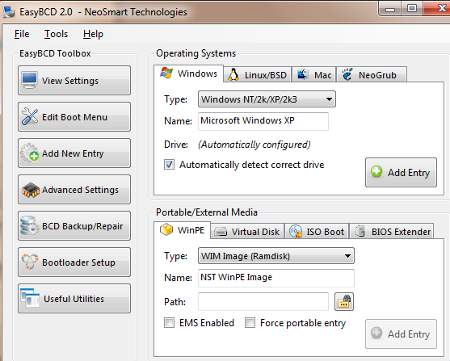
Now you will need to include Windows XP into the Boot menu as well. Click on the “Add New Entry” option on the left side and select “Windows NT/2k/XP/2003” from the drop down menu, type Windows XP then click “Add Entry”. The drive options will be automatically configured so there’s no need to mess with that.
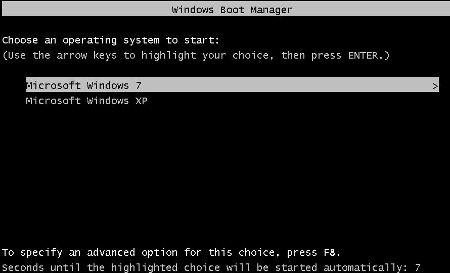
You can now reboot your computer and you should see those options for you to choose between Windows XP and Windows 7. I hope this article on how to Install XP after Windows 7 is easy for all to follow.
7 Comments Already
Leave a Reply
You must be logged in to post a comment.

EasyBCD is a great boot manager…for those who find it hard to implement the steps above, you could always use Vmware or Virtual box and install XP in virtual environment on Windows 7 to reap the same benefits.
Hi there! I’ve got one simple question for ya.
Why would one want to switch from XP to Windows 7?
When I was running Vista, everyone told me to get back to using XP. But now that 7 is out — I thought that was the new thing everyone would be using.
But I guess Microsoft’s operative systems just aren’t that good :)
/Nabil.
When Vista is released, a lot of hardware and software are not ready for that platform and thus resulted in a lot of issues. What’s more, Vista is very demanding in resources. That is why people opt to use XP instead of Vista. But the new Win 7 is so much better then Vista in terms of resource management. It has support for newer technologies like newer direct X and more rams.
Besides, Microsoft will be stopping support and updates for XP real soon.