Install Android 2.2 Froyo HTC HD 2
 Install Android 2.2 Froyo on HTC HD 2 using Diy Tech Tips installation guide. If you want to know what we’re talking about here, Google’s Nexus uses the Froyo 2.2 O/S. ;-)
To install Android Gingerbread on HTC HD 2, check this guide here
Well finally the wait is over ladies, gentlemen and computer geeks. It is going to be a one way trip and highly risky to do this, because it requires you to flash an unsigned rom into your HTC Cell Phone. It will void your warranty just like those people who choose to jailbreak their iPhone.
The procedures are quite lengthy but I will make it as simple as possible for you to understand. Even if you are totally clueless on what to do, just follow the steps one by one and you should get the job done as well. I suggest you go through this tutorial before you try other versions of Android because there are many flavors in the web.
Note: Diy Computers accepts no responsibility for you failing to read these instructions or carry out the procedure correctly. We have tested this method and know that it works perfectly, therefore your decision to proceed will be taken as your acceptance of full responsibility.
The whole procedure is the generally the same for any type of HTC cell phone you intend to install Android except that you must be very sure that you get the correct files for the other devices or you will end up damaging your HTC cell phone. The place to go get all your roms and stuff will be at XDA developers created by the computer geeks. I must empathize the importance of checking up what firmware or patch you need to use on other HTC cell phone models. Do not use the same files in this site if you are not entirely sure that your HTC cell phone is similar to the one used in this article. Please do your research at XDA developers.
Step 1 Preparation
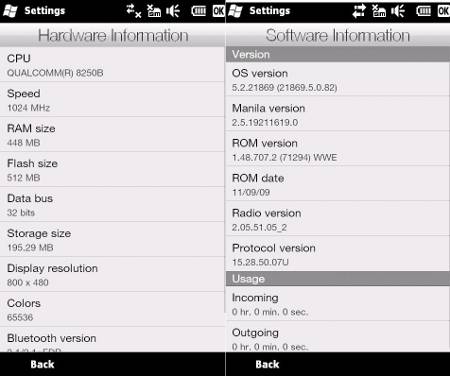
Do all your preparation checks. Before you start changing and flashing your HTC cell phone, note down all the firmware, OS version and radio firmware. You will need to keep all these information in your personal computer so that one day, in the event you wish to restore back to your factory defaults, you know what version of that firmware you need to download. Check your information by going to Settings => About Phone => Software Information
Note down all the information there. You can opt to use the screen shot app to take a jpeg of the whole screen.
Check your SPL first.
Turn your HTC cell phone off
- Press and hold the VOLUME DOWN then Press and hold the POWER button. After about 3 seconds the tri-coloured screen should appear.
- Read the number there, if it is not SPL 1.42, 1.62 or 1.66, you cannot proceed with the flash, your device must be those listed above
Step 2
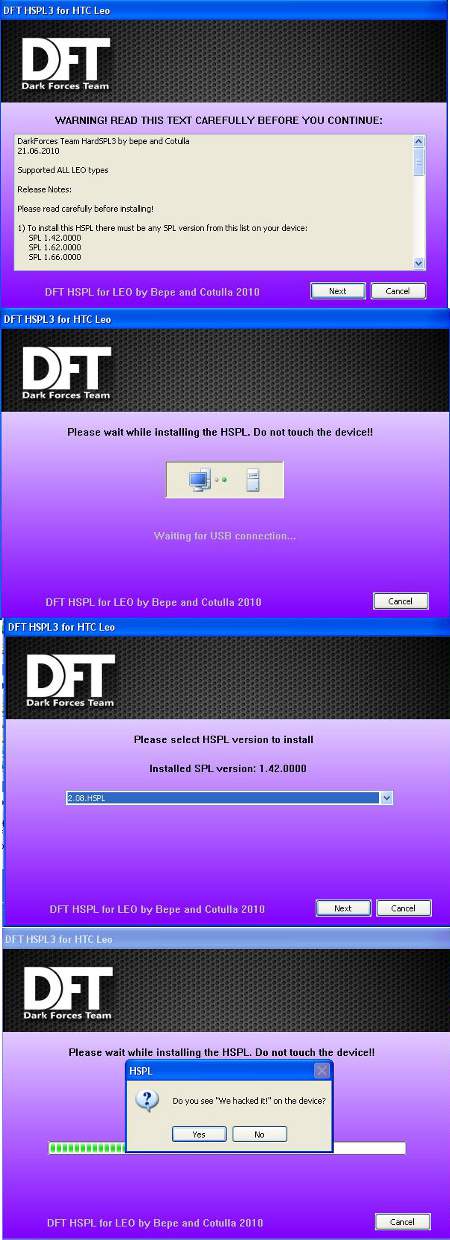
Install the HSPL. This is required to unlock the phone so that unsigned roms can be loaded on the HTC cell phone. Download the HSPL. Proceed only if you are sure you have checked your own SPL stated above. Hook up your phone and allow it to be connected to the personal computer via Activesync. Double click on the exe to start the flashing of the HSPL.
**Update
If you have a device with the SPLs listed below, you can use this HSPL2 to patch your phone.
- SPL 1.42.0000
- SPL 1.42.HSPL
- SPL 1.62.0000
- SPL 1.66.0000
- SPL 1.66.HSPL
- SPL 2.07.0000
- SPL 2.08.0000
- SPL 2.08.HSPL
Step 3
Install the custom Windows mobile rom
This is required because the original Windows mobile operating system in the device will not cooperate with the Android operating system that you are trying to install. Choose one custom Windows mobile operating system from computer geeks at XDA developers. Use one of these recommended builds as they have been tested to work.
http://forum.xda-developers.com/showthread.php?t=661266
http://hotfile.com/list/701370/0d49ddf
http://forum.xda-developers.com/showthread.php?t=651729
http://forum.xda-developers.com/showthread.php?t=618787
http://forum.xda-developers.com/showthread.php?t=591784
You may need to sign up as a member in XDA in order to access the links. Download the custom Windows operating system that you liked using bittorrent programs and extract it. You will see a .nbh file and a Leo_SoftwareUpgrade.exe. Double click on that and allow it to flash over your current Windows mobile operating system. Now when the flash process is complete you should be seeing a new Windows mobile operating system based on the theme you have chosen from XDA developers.
Step 4
Flash the radio
This procedure is very important, you must flash the radio or else the Android operating system will not be able to boot up, you can choose between a few radios that work with Android operating system from XDA developers. I use the Leo_RADIO_2.12.50.02_2
Extract the files and place them anywhere in your personal computer, double click on the CustomRUU.exe and proceed to upgrade your radio.

Step 5
Format your SD card
Take out your SD card and insert into your card reader in your personal computer. Install the Panasonic SD card format tool and format it. After formatting, you will discover that Windows operating system will not be able to read the card, but this is okay. Take out the card and insert into your HTC cell phone.
Step 6
Download your Android
You will now choose your Android operating system. I am using the New Froyo build by dan1j3l V1 .
Once again, download the whole rom using bittorrent programs and extract the whole zip to a folder.
Hook up your phone to your personal computer and let it complete the active sync so that you can view the files in the phone and storage. Create a folder in the storage card called “android” Copy all the extracted Android files to that folder.
Now copy the system.ext2 and the rootfs.img file to the main directory of the SD card. Note that it is copy, so you will not cut those 2 files out of the android folder but duplicate those 2 files and paste them outside the android folder.
Download this zImage and replace it with the one in the android folder in the SD card. This patch fixes a lot of issues that will result in a system freeze in that build. If you intent to use the GPS feature, download this system.ext2 file and replace the ones in the android folder and the one in the SD card.
Update *** You can also download this mccm v1.5 customize build
Similarly to other Android builds, the rootfs.img and system.ext2 must be in the Android folder and in the main directory of the SD card.
This Froyo build is more stable and does not require you to download the zImage or system.ext2 file. Just extract it as a whole and paste it into the SD card. Many thanks to mccmjoon76 from XDA developers.
**** Update even newer Android build
MCCM SE 1.5
For this build, all you need to do is to copy the Android folder to the SD card. No need for any files to be copied here and there. Just a folder on its own. First boot up is very long. You will be stuck in a black screen with a green HTC logo. It took so long for first boot up that I thought it has hanged and is not a functioning build. Just let it be. First boot up is VERY VERY VERY LOOOOOONNNNNNGGGGGG.
It is so long that I did not know when it was ready, I actually left it be and thought I might as well let it stay on and drain the battery so that I can do a proper full charge from a flat battery. But I came back to discover that, much to my horror, my HD 2 is running the HTC EVO 4G rom. :D LOL..
Step 7
Install the dual boot application
Now your Android operating system is ready to be launched. You can boot into Windows mobile and search the storage card for the Android folder. Click on the CLRCAD.exe first, nothing will happen, followed by the haret.exe. Android will start booting.
But that is silly because we want to look more professional. Download the dual boot cell phone app and install it inside of Windows mobile operating system, now when you start your Windows mobile operating system, you will get the menu to boot Android first or Windows.
Step 8
Congratulations
The first boot will take very long because it will take time to configure, so be patient. Subsequent reboots will be faster. You can download other Android builds and enter Windows mobile to copy those files in other Android versions to replace the ones in the storage card in the same manner to try other Android builds to find the most suitable one for your self.
Bugs and fixes
1. If you are unable to use the 3G network, go to Settings => Wireless & network settings => Mobile network settings => Access Point Names.
Enter as much information you can gather from your telco. But most important of all is the APN, the rest can be left empty. Only fill in the server if you cannot surf after entering the APN.
2. If the battery goes flat when you are using Android, you may encounter a white screen of death on your next boot up. Remove the battery and allow it to boot twice and it should load fine on the 3rd boot.
3. The 3G data connection will work for most online apps like Gmail, YouTube, Facebook etc. But browser surfing may be stuck at a point during the loading. You will need to wait for at least 10 minutes before the page will load. For a work around, Go to Settings => Wireless & network settings => Mobile network settings => Use only 2G networks.
This will make use of the Edge network which is still a lot slower then 3G but surprisingly it works for web browsing. Otherwise hook up to WiFi and use the WiFi for web browsing and it will be blazing fast.
4. Installing of Flash for Android is done via the Android market app. Search for flash player 10.1 beta 3 and it will install just like an app. Then download Skyfire browser or the Dolphin HD browser too from the Android market. Skyfire and Dolphin HD are the only browsers that makes use of the flash plugin.
5. If you are not able to turn on the phone or it stays in a black screen as if it is trying to start up, you can either, press a few times, but do it slowly, press once and wait for it in case it starts right up, or press and hold the “Hang up” button, if the phone is still alive, you should see the menu to set to vibrate, turn off etc.. Quickly tab the “set to vibrate” and slide the unlock to revive the phone. Then set back to normal after that. This is most likely caused by the Juicedefender app when it is trying to save power.
6. If you find that the battery is draining too fast. You will need to stop some services running. Services are different from killing the apps. Go to Settings => Running Services. Tap to stop those services that you are not using, like internet tethering or Android Messenger.
7. You will find that the apps will start up again and again all by themselves, there is no need to kill them off. Android will start some of the more commonly used apps and get them ready so that you can access them in the quickest possible way. Killing them off will result in a restart again and again, thus wasting even more battery
I hope this install Android HTC HD 2 guide is easy enough for all readers to follow and it will help all users fulfill their long awaited thirst to install Android on their HTC phones. One additional tip, when you start running Android, download the advance task killer cell phone app to kill those apps running in the background. It seems like some kind of Android joke that there is no app killer to stop those cell phone apps that are already running in the background. Enjoy yourself in the world of Android.
65 Comments Already
Leave a Reply
You must be logged in to post a comment.


Hello,
I am having problem with GPS. In WM it is running well (very quick even in the building) and in Android is takes forever to connect.
I am running Radio 2.12, ChuckysRom and mccm v1.5 customize build.
Any suggestions?
ok man, i’ll do that test, thanks for all the pieces of advice and the response time. maybe we can share a word on Ymessenger. I still couldn’t not find a soft that syncs my device to pc. none of them work. besides the sync function i was going to try to remove the 2.2 froyo and replace with the the 2.2 with sense just to see how it moves. second issue would be how to proceed with that, should I just remove the android from card and replaced with the one with sense? thanks again in advance.
Go to Settings => Wireless & network settings => Mobile network settings => Access Point Names.
The most important entry is the APN, just check if you have the correct name written in there.
I seldom have the time to chat online, and we may also have a problem due to time zones. Are you trying to sync Android to the computer? If it is Windows Mobile, you should be able to sync or else how did you get the new Windows Mobile Rom inside the device.
If you are trying to transfer files easily over to Android and PC, you can follow this guide
http://tutorial.downloadatoz.com/how-to-transfer-files-between-android-phone-and-pc-over-wifi.html
Sense for Android? Was there such a build? I thought Sense is only for Windows mobile. If you are going to use Android, even if the Windows Mobile build has Sense, it is not going to be running when you use Android.
Is there a Android build with Sense??? Let me know too…
i have issues with mms i get generic networ failure?? and cant download pic msgs.. help???
For MMS , it is another whole set of settings you need to fill in the settings => Mobile Networks.
You will need to know what to fill in there.
Very nice, I’ll get used to Android..! There’s one thing I’masking: is there any application, in Android, that let you turn into WM OS without turning off HTC..? I mean..once I turn it on in WM mode, I can access Android folder and then launch it. Is there any way to do the same thing running in Android OS..?
Thanx
Well, it is not logically possible, because what is actually happening is that when you start the HD 2, Windows Mobile is actually loaded first irregardless whether or not you have installed Android in it. It is only at that moment in time, you need to start off the haret.exe to kick start the Android. Therefore it is kinda pointless to have an app to launch Windows mobile from Android, since the easiest way to do so is to do a reboot, and it will enter Windows mobile anyway.
Besides, Android is not going to be happy to have something that supports Windows Mobile, since they are sort of “enemies” now in the smartphone war.
After installed as described above, everything seems to work fine, but when I make the phone call, no sound.
Both outgoing and incoming phone call seems to pickup the device just fine, but no sound!
Any idea?
Thanks in advaced.
I am thinking towards the possibility that you might have not clicked on the CLRCAD.exe first, followed by haret.exe
Honesty I haven’t tried making calls with it. I have 2 sim cards with one for normal voice calls and the other for Android and data surfing. But you can try other builds to see which one works for you.
I suggest you check out the Gingerbread article and install that latest build
WHAT IF I HAVE SPL 1.07 WHICH HSPL I HAVE TO USE
KNOW THAT I HAVE HT HD MINI
Sadly, HD mini is not ready to be flashed to Android yet. No solutions at this point in time.
http://forum.xda-developers.com/showthread.php?t=702530
Howe long should the first boot take???
I just wounder !!!
Please, i need heelp !!!!
The first boot will take 5 to 20 minutes. Some cases are even longer. If nothing comes up after one hour, you can say that the build is not working for your phone. There are various builds to try. Try other builds to see which build works for you
Install android 2 2 froyo htc hd 2.. Keen :)