Backup WordPress Site And Load It Offline With Xampp
Learning how to Backup a wordpress site and load it offline with Xampp is very useful. As long as you have a website, there will come a time where you will need to do some testing offline. You cannot possibily fool around with the site that is currently live and thus it will be useful to do any testing offline. Best of all, this software is free. Download and install Xampp.
Step 1
Backup your existing website
Perhaps a lot of people who have an existing website will know how to backup your site. But for the benefit of those who do not know how to do so, I will include some basic instructions on how to backup your site. You will need to download the whole site down, all the files and folders from your online server
To begin with, you will need to download your files from your online server with a software called Filezilla. You may need to seek assistance from your webhost on how to set the configuration to connect to your online server. Most web service providers will provide downloadable configuration text files that can be opened with filezilla software. Once you have successfully connected to the server, you will be able to browse the contents like a drive and simply copy everything to a folder on your local computer.
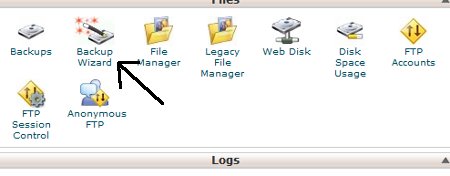
Some web host even offers packing your files for you in the form of a zip file and it can be served to you in the form of a download link. For wordpress users, simply download the wp_content folder. There is no need to download the whole site. You will need to download a fresh copy of WordPress too. Extract the new copy of WordPress and copy the extracted files and folders into the folder in htdocs. You will not copy the wp_content folder from the new WordPress package. Use the wp_content folder from your own website and put them together.
Backup the database too. The database is in the form of a single sql file. You will need to make use of the phpmyadmin to export out the database. Put the exported sql file together with the downloaded website contents if you do not want to misplace anything.
Step 2
Import your site to Xampp
After installing Xampp, you will get a folder in your C:\Xampp. There is a folder called htdocs in the Xampp. You can create as many folders as you like in the htdocs folder. Each folder you create will be one entire new website. For a simple website, simply copy everything to the new folder and you will be able access your site by keying the correct url in your browser. Simply start your favourite browser and key in http://localhost/yourfolder .
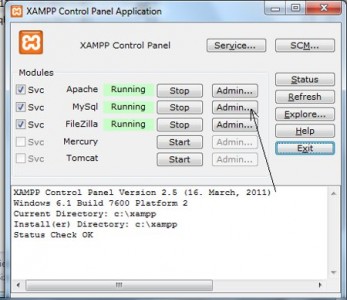
If you are holding on to a wordpress site, you will need to import the sql too. Make sure that you have started Xampp and the Mysql service is running, either click on the “admin” button of the Xampp
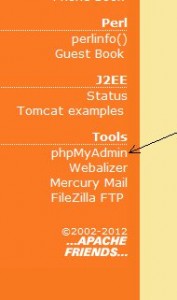
You can also go to http://www.localhost/ After that click on the Phpmyadmin link at the bottom left of the screen. You will get to a page that looks very similar to the ones in any webhosting service.
Using the import option, import back the sql file that you have exported out from your site. If you encounter an error that states that the sql is too big, you will need to make use of the Dos commands to import the sql file.
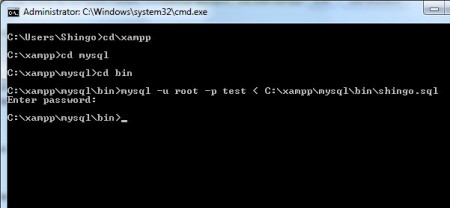
Copy the sql file to the C:\Xampp\mysql\bin. You will need to key in the commands like this.
First press the “Windows Key” + R and type “cmd” without the quotes. You will get a Dos prompt. Using the Dos prompt. Type
cd\xampp
cd mysql
cd bin
mysql -u root -p test < c:\xampp\mysql\bin\shingo.sql
There are a number of prefixes that you will need to replace with your own. For instance, in my command, you will need to replace root, test and shingo.sql. Generally, root is the user of the database which is by default root if you use xampp. test will be the name of the database that you have created in xampp’s phpmyadmin. You will need to replace this with your own prefix. And the last shingo.sql will be the sql file that you have exported out from your online site.
If the Dos command has been entered correctly, you will be asked to provide a password. This password that you need to key in will not be the one from your online site, but the one you set in Xammp, if any. The default password is nothing. So if you did not set any password, simply hit enter.
Step 3
Edit the phpmyadmin
You are required to make some changes to the database since the destination of your website will be pointing to the online version. You must change it to point correctly to the localhost. Using your favourite browser, type localhost and hit enter. It should take you to http://www.localhost/ . Click on the phpmyadmin link which is located at the lower left of the menu and it will take you to the phpmyadmin configuration.
You can also use the Xampp icon at the lower right hand corner of your taskbar, click on the admin button of Mysql and it should take you to the same place.
The entire list of databases are listed on the left. Click on the database that you are using and scroll to wp_options. Click on that and you will need to edit the siteurl. Change it to point correctly to the folder in your computer. Something that looks like http://localhost/folder/
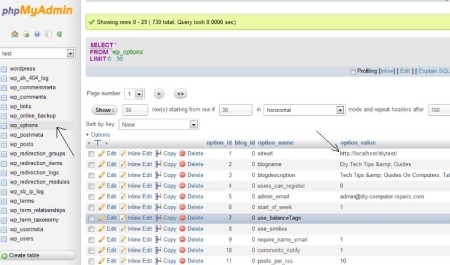
Remember to save your settings
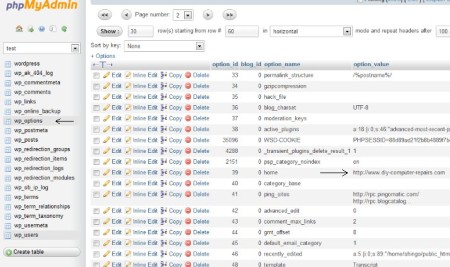
Go to the next page and change the home value to the same url that you have just keyed in. Save and that is all you need to do for the database
Step 4
edit the wp-config.php
This file is also important because if whatever you key here is wrong to begin with, it will not connect to your website. Similarly, you need to change it to point correctly to be pointing locally. Edit or open that file using any text reader such as notepad. Of course you can use dreamweaver or any other advance html editor, but there is no need to. There are 4 things to change.
define(‘DB_NAME’, ‘test’);
define(‘DB_USER’, ‘root’);
define(‘DB_PASSWORD’, ”);
define(‘DB_HOST’, ‘localhost’);
Simply edit and replace the words in between the quotes, to the ones that correspond to you. Do not replace those in the front. For instance, in my example, I will change the words, test, root, password and localhost. For the password, if you did not set any password, simply delete all the letters in between the ‘’ quotes.
All the values that you need to key in are the values that you use in the Xampp, not the online web server. If you did not set any fancy settings, The first 3 settings will stay similar to mine. Only the database name will be different.
Step 5
Success
If you done all these correctly, you will be able to gain acess to your website by keying http://localhost/yourfolder
The folder name will be the name of the folder you created in htdocs with your whole website in there. The only problem you will encounter is that all your links to your posts are broken, simply login to your wordpress like how you will do, and set the permerlinks to default as page numbers first. Then change it back and you will be able to view all your posts as per normal. I believe this guide is very useful for all users who run a website.

Leave a Reply
You must be logged in to post a comment.